


Sometimes a photograph looks almost perfect.
The light is good. The moment has been captured. The composition works. You press the shutter, look at the camera display, and everything seems fine. Later, you open the image on a larger screen and notice something unpleasant – the eyes are not quite sharp enough, the face looks slightly blurred, or the focus has fallen somewhere behind the person.
One of the first questions almost every beginner photographer asks is: “Why are my photos out of focus?”
The answer is not always obvious, because not every unsharp photograph is caused by incorrect focus. Sometimes the autofocus has genuinely selected the wrong area. At other times, the person was moving too quickly for the chosen shutter speed. The photographer may also have moved the camera slightly. And sometimes the focus is perfectly accurate, but the depth of field is so shallow that only a very narrow part of the scene appears sharp. Learning to recognize why a photograph is blurry is far more valuable than simply knowing where the autofocus button is. In this article, we will explore focus and autofocus in a clear and practical way – how they work, the mistakes beginners often make, and how to achieve more consistent and sharper results.
This topic is also an essential part of my beginner photography course in Sofia, where we move from theory to real-world camera practice and a variety of photographic situations.
Not Every Blurry Photograph Is Out of Focus
This is one of the most important things to understand from the very beginning. When we look at a photograph that does not appear sharp enough, we often say: “The focus missed”. Technically, however, the reason may be completely different. In most cases, we need to distinguish between four situations:
- incorrect focus – the camera focused on a different area;
- motion blur – the subject moved during the exposure;
- camera shake – the camera moved in the photographer’s hands;
- shallow depth of field – the focus is correct, but the area of acceptable sharpness is very narrow.
These problems can look similar, but they require different solutions. If the cause is incorrect focus, changing the ISO will not necessarily help. If the cause is movement, choosing a different focus point will not solve the problem. If the depth of field is too shallow, the camera may have focused perfectly on a person’s eyes, for example, while part of the face is already out of focus, making the photograph appear softer overall.
Before changing your settings, you first need to understand exactly what the problem is.

Take the Checklist With You
I have prepared a short practical guide to focus and sharper photos that you can save and use while shooting. Inside, you will find the essential autofocus settings and 7 quick checks to make before pressing the shutter, clearly organized in one place and available completely free in PDF format.
3 pages. Short. Clear. Practical.
What Does Focus Actually Mean in Photography?
When you focus, the optical system of the lens adjusts so that subjects at a certain distance are rendered as clearly as possible on the sensor. We can imagine an invisible plane of focus passing through the scene. Around it, there is an area that we perceive as sufficiently sharp. This area is what we call depth of field. Focus and depth of field are related, but they are not the same thing.
Focus determines where you place the point of maximum sharpness.
Depth of field determines how large an area around that point will appear acceptably sharp.
This distinction becomes especially important in portrait photography. If you photograph someone up close at f/1.4 or f/2.0 and one eye is slightly closer to the camera than the other, it is entirely possible for one eye to appear perfectly sharp while the other already falls outside the sharpest area. This does not mean there is a problem with the camera or the lens.
How Does Autofocus Work?
Modern cameras can determine focus automatically using dedicated autofocus systems. The technology differs between DSLR and mirrorless cameras, but for a beginner photographer, the more important question is this: The camera needs to know what you want to be in focus and whether that subject is stationary or moving. This is where the different AF modes come into play.
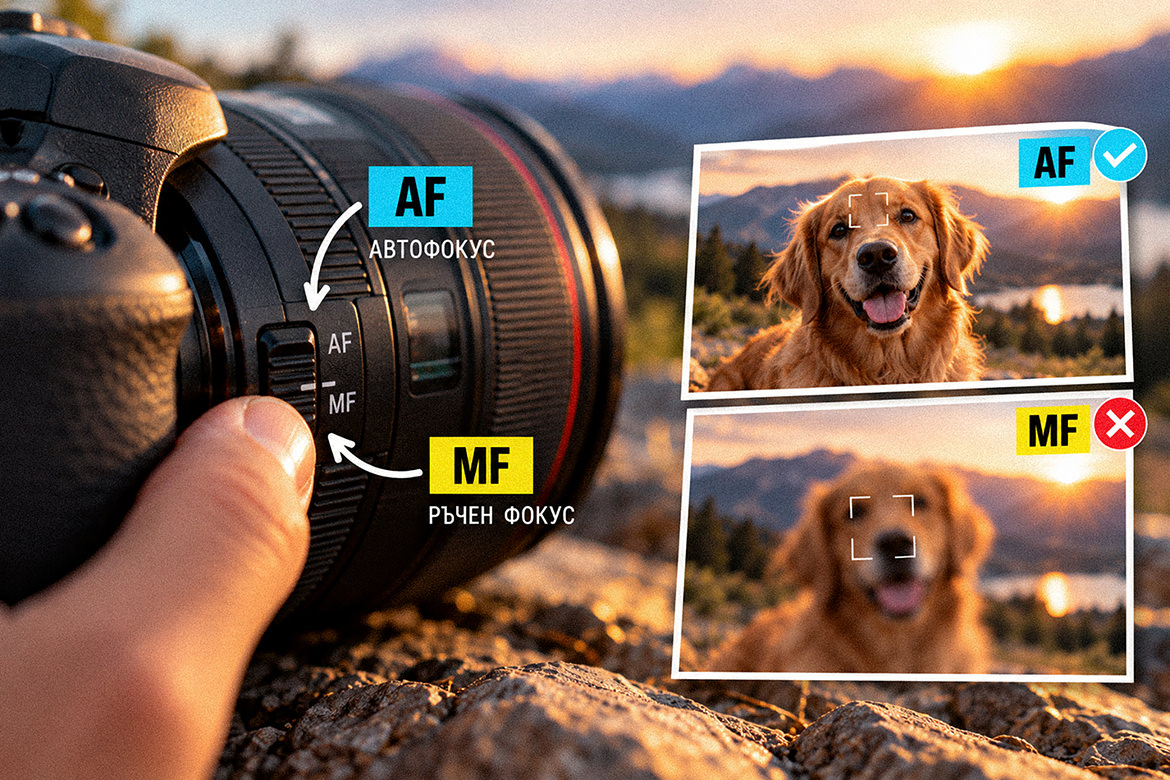
AF-S / One Shot – When the Subject Is Stationary
The terminology varies between manufacturers. You will often see AF-S, while Canon uses One Shot AF. The basic principle is similar. The camera acquires focus and then locks it at a specific distance. This mode is suitable for relatively stationary subjects:
- a still portrait;
- architecture;
- product photography;
- landscapes;
- a person standing still.
A problem can arise if you focus on a person and they then take a step toward you or move farther away. The focus was correct at the moment you focused, but the distance has now changed.
AF-C / Continuous – When the Subject Is Moving
When photographing movement, you need a system that continues to update focus. This mode is usually called AF-C / Continuous AF. On many Canon cameras, you will see AI Servo or Servo AF. While autofocus is active, the camera continues to track changes in the distance to the subject and adjusts focus accordingly. This is a much more suitable choice for:
- children playing;
- a person walking toward the camera;
- sports;
- dancing;
- animals;
- dynamic events.
Imagine a child running toward you. With One Shot, you focus when the child is, for example, five metres away. Half a second later, the child may already be significantly closer. With Continuous AF, the camera attempts to track this change. Choosing the correct AF mode is just as important as positioning the focus point itself.
Focus Point – Are You Letting the Camera Decide?
One of the classic beginner mistakes is allowing the camera to decide automatically where to focus. The camera may decide, for example, that the most important subject is not the person’s eye, but a contrasting object behind them, their shoulder, their clothing, or another person in the scene. The camera does not know your intention. It analyses the scene. You decide what matters.
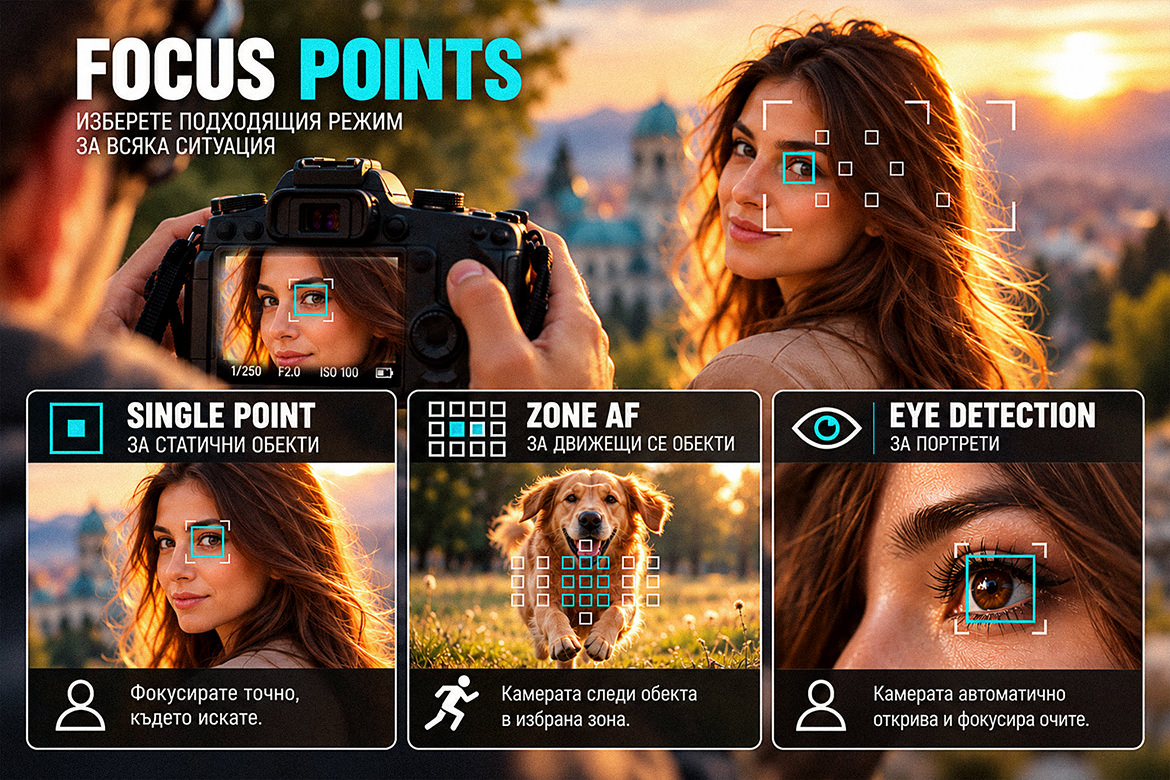
Single Point AF
With Single Point AF, you select a specific focus point. This gives you much more precise control. In a portrait, for example, you can deliberately position the focus point over the person’s eye instead of letting the camera choose automatically. Single Point is especially useful for:
- portraits;
- shallow depth of field;
- detail shots;
- situations where a very specific part of the scene needs to be sharp.
Zone AF
With a zone of focus points, you give the camera a larger area in which to look for the subject. This can be useful when photographing movement, when it is difficult to keep a single focus point precisely over the subject. You gain slightly less precise control, but more freedom when tracking movement. There is no single mode that is right for every situation.
The autofocus system should be chosen according to the scene.
Eye Detection and Modern Mirrorless Cameras
Many modern mirrorless cameras can automatically detect faces and eyes. Eye AF is an extremely useful tool, especially for portraits and movement, but even the most advanced system does not remove the need for the photographer to understand what is happening. The camera may select the wrong person in a group. It may temporarily lose track of the eye. It may struggle with low contrast, strong backlighting, or a partially obscured face. Automation is an assistant. The final decision still belongs to the photographer.
7 Reasons Your Photos May Look Blurry
1. The Focus Has Fallen on the Wrong Area
You are taking a portrait, but instead of the eye, the hair behind it or the background appears sharp. This is a classic example of misplaced focus. Check where your focus point is positioned and do not let the camera choose automatically when the scene requires precision. In portrait photography, the main point of reference is usually the eyes.
2. You Are Using the Wrong AF Mode
You focus on a child using One Shot while they are constantly running toward you and away again. The camera may have achieved perfect focus, but only for the distance at that specific moment. For movement, switch to AF-C / Continuous / Servo AF and allow the camera to keep updating focus as you track the subject.
3. The Shutter Speed Is Too Slow
In this case, the problem may have nothing to do with focus at all. Imagine photographing a person who is walking with the camera set to a shutter speed of 1/30 second, which is relatively slow. The camera may have focused perfectly on the face. However, while the sensor is recording the image, the person continues to move. The result is motion blur. Look carefully at the photograph. If the stationary background is sharp but the moving person is blurred, the likely cause is the shutter speed rather than the autofocus.
I explore shutter speed, ISO and aperture in detail in the article “Exposure in Photography: ISO, Aperture and Shutter Speed for Beginners”.
4. The Camera Itself Has Moved
There is a difference between subject movement and camera movement. If you shoot handheld at a very slow shutter speed, even a slight movement of your body or the action of pressing the shutter button can affect the image. In this case, it may appear that the entire photograph is slightly blurred. The longer the focal length, the more noticeable camera shake can become. As a rough guideline, photographers traditionally use the rule that the shutter speed should not be slower than the reciprocal of the focal length. For example, at 100 mm, around 1/100 second or faster. This is only a general guideline, however. Camera or lens stabilization, sensor resolution, holding technique and the movement of the subject itself can all significantly affect the shutter speed you actually need.
5. The Depth of Field Is Too Shallow
A wide-open aperture can look beautiful. f/1.4, f/1.8 or f/2 can separate the subject from the background and create a wonderful softness. But the shallower the depth of field becomes, the smaller the margin for error. This is especially true when you are close to the person. You may focus on the eyelashes while the tip of the nose already begins to look soft. In a portrait taken at an angle, one eye may be sharp while the other is not. This is not necessarily a fault. It is an optical result of the chosen combination of aperture, distance and focal length.
6. You Focus and Then Change the Distance
This happens very easily. You focus on the eye and then lean slightly forward or backward. Or the person moves almost imperceptibly. At f/8, you may not notice any difference at all. In a close portrait at f/1.4, however, the movement may be enough to shift the eye outside the sharpest area. A similar risk exists with the focus and recompose technique – you focus, lock the focus and then rotate the camera to change the composition. With greater depth of field, this is often not a problem. With a very shallow depth of field and a short shooting distance, however, the shift can become visible. For this reason, whenever the camera system allows it, it is better to select a focus point as close as possible to the exact area you want to appear sharp.
7. The Scene Is Difficult for Autofocus
Autofocus systems work best with clear detail and contrast. A very dark scene, a plain surface, strong backlighting or a subject without distinct detail can make focusing more difficult. In situations like these, try placing the focus point over an area with greater contrast or a clearly visible detail. Also check something very simple that is often overlooked – the minimum focusing distance of the lens. Every lens has a minimum distance below which it simply cannot focus. If you move too close to the subject, pressing the autofocus button will not overcome this physical limitation.
Why Is One Eye in Focus While the Other Is Not?
This question deserves special attention because beginners often assume that this result means something is wrong with the camera. Imagine a close-up portrait taken with a wide-open aperture. The person is not facing the camera completely straight on, and one eye is a few centimetres closer to you than the other. You focus on the nearer eye. With a shallow depth of field, the farther eye may already fall outside the area that appears maximally sharp. How noticeable this effect becomes depends on several factors:
- the selected aperture;
- the distance between the camera and the person;
- the focal length;
- the angle of the face in relation to the camera;
- the size of the acceptable zone of sharpness.
If you want both eyes to appear sharper, you can, for example, stop the aperture down from f/1.4 to f/2.8 or f/4, increase your distance from the subject, or change the person’s position.
Do not chase the smallest possible f-number simply because your lens allows it.
Focus and Sharpness Are Not Exactly the Same Thing
The two terms are often used as if they mean the same thing, but it is useful to distinguish between them. You can have a correctly focused photograph that still does not appear sufficiently sharp. Possible reasons include:
- subject movement;
- camera shake;
- very high ISO and strong noise reduction;
- the optical characteristics of the lens;
- diffraction at very small apertures;
- heavy magnification or excessive cropping of the image;
- post-processing and sharpening.
That is why the question “Is it in focus?” is not always enough. A more useful question is: “Why does this part of the photograph not look sharp enough?”
How Can You Identify the Problem in a Particular Photograph?
After taking the photograph, zoom in on the most important part of the image – in a portrait, this is usually the eyes. Then look at the surrounding area as well, including the background.
If the eyes are soft but the ears or the hair behind them are sharp – the focus has probably fallen behind the intended point.
If the person is blurred but the stationary background is sharp – the shutter speed is probably too slow for the movement.
If almost the entire photograph shows a similar type of blur – the camera may have moved during the exposure.
If one eye is perfectly sharp while the other gradually becomes softer – you are probably seeing the effect of shallow depth of field.
This is a far more useful way to learn than randomly changing every setting at once.
Practical Settings for a Few Typical Situations
A Still Portrait
Start with a single focus point or reliable Eye AF. Use AF-S / One Shot if the person is relatively still. If they are posing more dynamically or moving constantly, Continuous AF may also be appropriate. Place the focus on the eye that is closer to the camera.
A Child at Play
Use AF-C / Continuous / Servo AF. Choose a focus area mode that you can reliably keep over the child, and use a sufficiently fast shutter speed. Here, it is important to remember:
Autofocus tracks distance. Shutter Speed freezes movement.
You need both.
A Group Photograph
Do not automatically use the widest possible aperture (f/1.4, f/2.0 …). If the people are positioned at different distances from the camera, you need sufficient depth of field. Try to arrange them on a similar plane and choose an aperture that gives you the required zone of sharpness (f/3.2 – f/8.0).
A Portrait at a Very Wide Aperture
Work carefully with the focus point. Avoid unnecessary forward or backward movement after focusing, and check the eyes at higher magnification. A beautiful background has little value if the most important part of the face is out of focus when that was not your intention.
A Simple Exercise to Help You Understand Focus
Place three small objects on a table at different distances, one behind the other. Select a single focus point. Take the first photo while focusing on the nearest object. Take the next one while focusing on the middle object. Then take a third photo while focusing on the farthest object. After that, repeat the exercise with a wider and then a narrower aperture. Observe:
- where the point of maximum sharpness is located;
- how the foreground changes;
- how the background changes;
- how the aperture affects the area that appears sharp.
Then try the same exercise with a person moving toward you – first with AF-S / One Shot, then with AF-C / Continuous. This short exercise will teach you more than dozens of random photos taken in Auto mode.
7 Checks Before You Press the Shutter
When you are just starting out, all the different settings can feel like too much information at once. Over time, many of these decisions become automatic. In the beginning, however, you can build a simple routine:
- AF mode – is the subject stationary or moving?
- Focus point – what exactly needs to be in focus?
- Shutter Speed – is the shutter speed fast enough for the movement?
- Aperture – do I have enough depth of field?
- ISO – does it allow me to use the aperture and shutter speed I need?
- Camera stability – am I holding the camera steadily?
- Final check – is the most important part of the frame actually sharp?
These seven checks are a solid foundation for many photographic situations.
Would You Like More Practical Guidance for Beginners?
Photography becomes much easier to learn when complex concepts are broken down into small, clear steps. Subscribe to my photography newsletter to receive new articles, practical tips, exercises and resources for people who want to understand their camera better and create stronger images.
Subscribe to our email newsletter – it’s free!
Frequently Asked Questions About Focus and Blurry Photos
Why are my photos blurry even though the camera shows that it has focused?
Because correct focus does not automatically guarantee a sharp photograph. The subject may have been moving while the shutter speed was too slow, the camera may have moved, or the depth of field may have been too shallow.
Where should I focus when taking a portrait?
In a classic portrait, the eyes should usually be in focus. If the face is at an angle and the depth of field is shallow, you will usually focus on the eye that is closer to the camera.
Which autofocus mode should I use for a moving person?
Use a continuous autofocus mode – AF-C, Continuous AF or Servo AF, depending on the camera manufacturer. This allows the system to keep updating focus as the distance between the camera and the subject changes.
Why is the background in focus but the person is not?
The camera has probably selected the background or another high-contrast detail instead of the person. Use a specific focus point, focus area, or reliable face/eye detection and take control of where the focus is placed.
Why is one eye sharp while the other is blurry?
The most common reason is shallow depth of field. This happens especially in close-up portraits, with a wide-open aperture and when the face is not completely parallel to the camera.
Can a blurry photo be fixed in post-processing?
A slight softness, for example around a person’s eyes, can sometimes be improved with sharpening and modern software. However, post-processing cannot reliably restore information that was never recorded correctly in the first place. Severely missed focus or significant motion blur should not be treated as something that can always be fixed later.
A Sharp Photograph Starts Before You Press the Shutter
Focus is not just a technical setting. It is a decision. When you place the focus on the eyes, you are telling the viewer where to look. When you leave part of the scene soft, you separate what matters from what is secondary. When you track a moving person, you are not simply using Continuous AF – you are trying to anticipate the next moment. In the beginning, it is completely normal to check the autofocus mode, focus point, shutter speed and aperture before almost every shot. Gradually, you begin to do this without consciously thinking through every individual step. That is when the camera stops feeling like a device full of settings and starts becoming a tool for showing what you actually want to express. The goal is not for every part of every photograph to be perfectly sharp. The goal is for what you have chosen as important to look exactly the way you intended.
From Theory to Practice
Focus is only one part of the foundation. To photograph with confidence, you need to understand how it works together with exposure, shutter speed, aperture, depth of field, movement, light and composition. This relationship between the different elements is exactly what we work on in my beginner photography course in Sofia. The training is in person and is designed for people who want to move beyond random shooting and Auto mode, understand their camera, and begin making conscious photographic decisions. We work in a small group, go through the theory in a clear and structured way, and then apply it in practice in real-world situations. Because photography cannot be learned through reading alone. You learn it when you look through the viewfinder, make a decision, take the photograph, see the result, and understand why it looks the way it does.
See the programme and upcoming dates for the beginner photography course in Sofia.
Author: Lubomir Jiponov – professional photographer and photography instructor in Sofia.

Other topics you may find interesting:
• For the Blog of Lubomir Jiponov Photography, please visit Blog.
• For media features and press coverage about me, please visit Press.
• For international recognition, please visit International awards.
• To learn more about my journey, experience, and personal style, please visit About me.
• For reviews and opinions about Lubomir Jiponov Photography, please visit Testimonials.
• To get in touch with me, please visit the Contact.